High definition video at a low price (by Conrad H. Blickenstorfer; photography by Carol Cotton)
There are some things in life that seem to be too good to be true, and as far as shooting underwater video goes, the Bonica Snapper HDDV is one of them. That's because of its price, size and capabilities. What you get here is a very small and handy video camera that can shoot 720p high definition video at up to 30 frames per second as well as 8-megapixel stills. No need for tapes, disks or a hard drive; the Bonica records on standard SD Cards which are now inexpensively available in capacities of 4, 8, 16 and even 32 gigabyte, enough for hours of video.
When shooting underwater, a good protective case is as important as the camera itself, and those cases can be quite expensive as well as bulky and heavy. Somehow, Bonica managed to create one that is very cleverly designed so as to minimize size and weight, and it doesn't even cost an arm and a leg. And Bonica even addressed any diver's biggest nightmare when it comes to cameras - that of the case springing a leak - with a unique dual-case system where an inner skin provides extra protection, enough actually to take the camera into shallow water (up to 12 feet) with just the soft inner case.
Then there's the issue of proper illumination. Light fades fast underwater, and colors even faster. At 15 feet red is gone, and by the time you reach typical recreational dive depths everything is green and blue. In order to capture the brilliant colors of a tropical reef you need good, strong lighting, and Bonica provides that as well.
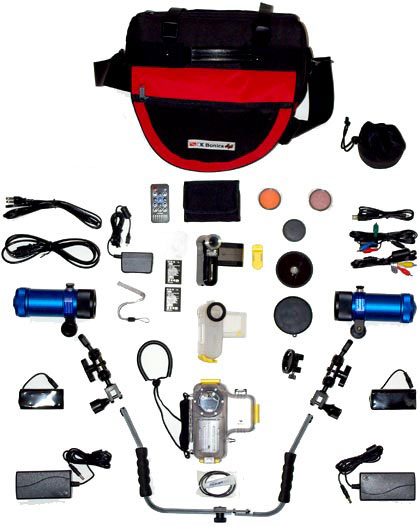
When we met with Bonica president Kenneth Ho at the 2008 DEMA show in Las Vegas, we were impressed with the camera and invited Bonica to send us a review unit for an upcoming dive trip. The box that arrived at the scubadiverinfo.com offices was larger than expected. That's because Bonica didn't just send the bare camera and underwater housing. Instead, we got a neat Bonica bag that contained the works: camera, housing, filters, two dive lights with brackets, remote control, and all the assorted power supplies, cables, manuals and a slew of other accessories.
The picture below shows the complete Bonica Snapper HDDV system:
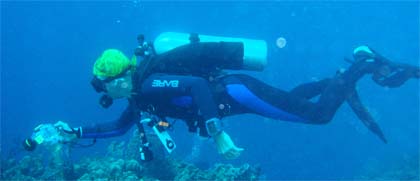
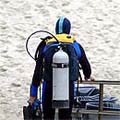
And here is what it all looks like in action on a dive in the Caribbean:
Bonica Snapper HDDV with dual lights on
The camera itself
The Bonica Snapper HD camera itself is a small and light unit made by Aiptek, a Taiwanese company that has been in the business of providing innovative, economically priced electronics for many years. It can record in 1368 x 768 pixel format, which is the resolution required for 720p high definition playback on an HDTV. Full 1080p playback would require 1920 x 1280 pixels, but 1280 x 720 is much higher than the 720 x 480 miniDV format that was considered the state-of-the-art in amateur video for many years. You can, of course, also record in lower resolutions (720 x 480 and 352 x 240), but why would you?
The Bonica camcorder is like a modern digital camera insofar as it can shoot both video and still pictures. In addition to high-def video you can also shoot 3, 5, and interpolated 8-megapixel still images. Switching between modes couldn't be simpler. Push one button for video, another to take a still. And since both video and pictures are recorded on the same SD Card media, there's no need to switch or use different methods to retrieve the data.
Underwater case system
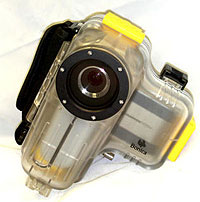
What makes the Bonica able to go, and shoot, underwater? That would be the special poly-carbonic underwater case system and the illuminating lights. Those familiar with underwater photography are familiar with those clear clamshell housings that have strong clasps and an O-ring to keep water out, and special pushbuttons to control the camera.
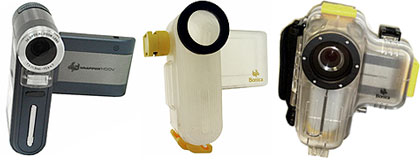
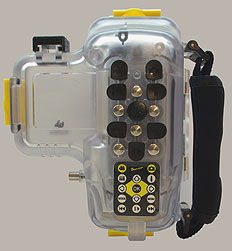
The bullet-proof case system for the Bonica video camera is no different except for its exceptionally clever design that minimizes size. The case is form-fitted around the Bonica with its very bright 2.4-inch video display rotated out into viewing position. What's different from most underwater cases is that the Bonica has both a soft inner case (shown with the camera on the right) and a hard-shell outer case. So even if the outer case leaks (which it never did), the camera inside remains protected! There's also another interesting aspect: the case contains a special remote that controls the camera, so it's not all hardware buttons as in most digital camera underwater cases. Below you can see the camera, inner case, and outer case:
If you want to shoot good pictures and video underwater you need good light. The Bonica camera has both a fairly strong flash and a video illuminator light, but those are secondary to the camera's external strobe lights. Our setup came with two heavy-duty anodized aluminum lights that are mounted via lightweight flexible arms with infinite adjusting capability. The lights are manually set via a heavy-duty push button that cycles through off, 30 watts, 40 watts and 60 watts. They are powered by 45 watt-hour rechargeable Li-Polymer batteries. This means you can turn one or both lights on at any time, as required. Depending on the power setting, you'll get a burn time of around an hour, enough for most dives.
Below you can see the camera in use during a dive:
The full Bonica Snapper HDDV setup with dual video lights
Setting up the lights and camera
Setting up a full underwater camcorder rig is a bit more complicated than simply popping a still camera into a case. Before you fit the inner skin, which fits very snugly over the camera and over the camera, make sure you have a SD memory card installed and also put a special spacer plate in place that keeps the video display in its proper position and allows access to the on/off button. Also make sure you have a fully charged battery as it takes time to disassemble the whole system if you discover you're low on juice once you're all set up and ready to go. Finally, while the elastic inner case seems plenty tough and stretchy, I'd still be careful as you pull it over the camera.
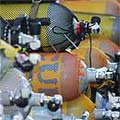
Setting up the video lights requires some assembly also. The main bracket consists of two parts so that the Bonica can be operated with either one or two lights. That requires a Philips screwdriver, so make sure you have one handy at the dive location (we had to borrow one from the resort's boat repair shop). The bracket arms are made of aluminum and are marvelously light compared to some of the gear we've tested in the past. Ball joints allow them to be twisted and rotated at any angle and in any direction. The balls are hard plastic with grooves for rubber rings that provide the necessary friction. They don't grip quite as well as the rubber balls used in RAM-Mount systems, so you need some elbow-grease and non-slippery hands to tighten them enough. The attachment fixture on the lights is made of plastic and one of them got stripped when we tightened the screw enough for the light to stay in position. Another midnight trip to the boat repair dock resulted in a locknut that saved the day.
Any rig with two lights is going to be bulky, but the full Bonica setup is still light enough to easily be transported to dive sites, and thanks to the many joints it can be folded into a manageable size. Weight has its pros and cons, though. On land the light weight of the Bonica setup is a big plus. Under water the camera itself without the lights is positively buoyant. This means it won't ever drop into the abyss, but it also means you need to make sure it doesn't escape to the surface and you may need an extra pound or two of weight on your weightbelt or weight-integrated BC. However, if you use it with the video lights, the overall system becomes negatively buoyant.
Approaching the wreck of the Prince Albert
Going underwater
Camera controls are simple and easy to use. Push the left button for video, the right for a still picture. Buttons are clearly marked and big enough so that you could operate each with your thumb without fear of hitting other buttons. There is also a label below the buttons that explains the function of each. The Snapper HDDV case actually uses an interesting approach: the buttons operate a remote control that sits inside the case. The remote control even has its own water resistent inner case.
Video is very straight-forward. Stills requires getting used to as the camera first brings up a red bracket upon pushing slightly, then a green one when it is ready to take the shot.
Overall, we did almost 20 full dives with the Bonica, both with and without the video lights, and never encountered any problems. Since the camera is so compact you can move close to a subject much more easily than with bulkier underwater camcorders. And the 0.54X 46mm wide angle lens let us capture a glorious amount of both scenery and detail. The 2.4-inch LCD is bright and easy to see, something that we never take for granted.
A question of balance
When you go underwater, you quickly realize that proper balance is important for comfortable use and handling. With the video lights the setup is negatively buoyant and, depending on how the lights are arranged, quite top-heavy. When I first took it under, the assembly wanted to tip over forward, making it difficult to handle the camera. So as soon as I got back up on the boat, I reconfigured the brackets so that the center of gravity of the lights was exactly above the handles. This way, the camera instantly felt lighter and more maneuverable. It's also possible to configure the lights so that the overall center of gravity is closer to the camera, which improves handling. Carol wished that the handles of the bracket assembly were closer together for easier handling.
Underwater, turning the lights on and off turned out to be both simple (just pushing a button instead of relying on settings or menus) and complex. The complex part is due to the fact that you cannot see whether the light is turned on or off without holding your hand in front of it or turning the camera to look at the light. Likewise, there is no indication as to the light intensity level. So the procedure is turning the camera on, then pushing the power button on light one one to three times to get the desired intensity, then do the same on light two. Other than counting how many times you pushed the button there is no other way of knowing whether the lights are on, or what power setting they are at. To turn the lights off you push the buttons again, but other than putting your hand in front of the light, it's hard to tell if they are on or off. Since the lights only have a burn-time of about an hour, conserving battery power is important. We'd like to see a way to tell if the lights are on or off, and at what intensity.
Why so much emphasis on lighting? Because underwater, proper lighting is absolutely essential. Beneath the surface there is hardly ever enough light, and at depth everything loses color as well. So in order to achieve that luscious colorful underwater video look, you need as much natural and artificial light as possible. You may still be able to shoot without video lights, but the video will be grainier and everything looks green. Light is the key to good underwater video, and the Bonica camera likes a lot of light.
How did it come out?
So what about the video quality of this interesting combination of inexpensive consumer camera and superb quality underwater case and lighting? We had high expectations for the 1368 x 768 pixel high definition mode. After all, the high-res modes of most still cameras is only 640 x 480 - a quarter of the resolution - and clips uploaded to YouTube are usually just 320 x 240 QVGA, or 1/16th the resolution.
Thing is, just like with still cameras, resolution isn't everything. A good one megapixel still picture with lots of light can be better than a 10-megapixel shot under trying conditions, and it's no different with video cameras. The Bonica records at high res, but if there is not enough light, there's only so much that can be done.
Also, we found that it is hard to judge how good video is by replaying it on the small LCD. When we inserted the SD card into the Acer One netbooks (8.9-inch 1280 x 600 screens) we'd taken along, Windows XP tried to run the Bonica's .MOV files in the Microsoft Media Player which, surprise, does not support the format. Bonica's documentation offers detailed suggestions as to how to run the video files on Windows but we downloaded Apple QuickTime to view the video instead. However, the Atom N270-powered Acer Ones did not have the hardware support and enough punch to smoothly run 30 fps video in QuickTime and movie playback was jerky with lots of skipped frames. It really wasn't possible to determine video quality on our underpowered computer hardware.
Once we got back home and transferred the files to an iMac24 running Mac OS X, the video displayed smoothly and we could finally examine our movies. Initial impression was quite good, but we also saw some flaws. The camcorder's AF system often hunted back and forth in an effort to achieve focus and it'd take a fraction of a second for the camera to lock on and focus. If you held the camera still and the scenery moved around it, the video appeared very sharp. If you were moving, the camera never had a chance to really focus and kept on hunting in and out, and so the high resolution could not be put to good use. This is when we discovered the source of the noise I mentioned earlier: it was the auto focus motor hunting for the best focus. This is not an optimal arrangement and we hope a firmware upgrade will address the AF hunting or let you turn off autofocus.
We also found that with little light underwater, the camera often seemed to record at high sensitivity and was then unable to cope with bright reflections from equipment, bright colors (like yellow fins) and, especially, surface light and surface light reflections, resulting in blown-out areas. This may be a dynamic range limitation of the camera and you have to plan around it by avoiding wide dynamic range shooting.
After shooting with the Bonica for several days we concluded that it can take very good video for such a reasonably priced camera IF you observe a few rules.
Always use as much natural or strobe light as possible. This is the only way to get good color in an underwater environment.
Make certain the White Balance is properly set (Bonica recommends "cloudy").
Use the proper filters (Bonica offers two).
Move around as little as possible. The best video results from holding the camera totally still and have the scenery move instead.
How about still shots? They can be amazingly good, though it all depends on expectations. A CMOS imager picture from an inexpensive camcorder wont compare to that of a dedicated digital camera with a good CCD imager, but the pics were better than expected. Interestingly enough, although the camera has a 5-megapixel imager, the 8-megapixel setting yields visually better pictures than the 5-megapixel setting.
Born for big-screen HD TV
Everything changed when we created a movie in iMovie HD on the Mac. We picked and edited scenes and spliced them together into a 25 minute movie that we then burned onto a DVD, using iDVD on the Mac. We then played the movie on a 52-inch Panasonic High Definition LCD TV in 16:9 format. The result was stunning. The video ran smooth and lifelike, video resolution and quality was exceptional, and audio was just fine.
What we saw on the big 52-inch screen was much better than regular TV and every bit as good as your average HD television. The big screen did not, of course, make up for our shortcomings as videographers, and it did not fix blown-out video or inadequate lighting, and the stepper motor noise was audible where we had not blended it out in iMovie HD, but the overall result was much better than we ever expected.
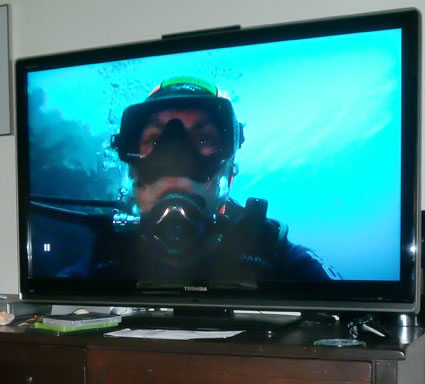
The picture below is a totally unprocessed snapshot of the TV playing back Bonica video.
Below is a video excerpt. It has been downsampled and compressed for web use and is therefore nowhere near as sharp as the HD movies we burned on DVD. You can view a HD version at vimeo.com by clicking on the "HD off" icon.
How is it all possible?
How can such an inexpensive camera record amazingly good high definition video? Because we're in the midst of a revolution where video compression technology is making ever higher resolution recording possible. The Ambarella A2-A1-RH chipset and technology used in the Snapper camera uses what's called H.264 compression for very good video at fairly small file sizes. This makes it possible to record on SD cards instead of tape, which means the expensive and fairly bulky tape transport assembly goes away. When you record in the MPEG-2 standard onto HDV tape, you record at about 25 mbps. H.264 compresses much more with similar video quality and records high quality digital video at about 10 mbps, which means you can fit more video onto less space, making SD cards feasible. We used an 8GB card and the camera indicated over four hours of 720p video.
The image sensor itself is a Micron/Aptina MT9P001 5-megapixel 1/2�.5-inch CMOS that uses the company's DigitalClarity technology to achieve low noise levels and decent low-light sensitivity and quality as good as a conventional CCD imager, the kind you find in dedicated cameras. CMOS imagers, however, use MUCH less power because they do not need all the support circuitry that CCDs require. To read about CMOS sensors, check aptina.com/products/image_sensors.
If you go online and read what people have to say about the camera itself, you find the usual gamut of opinions. Those who expect miracles from a very inexpensive camera are disappointed whereas those who work with the camera and allow for its limitations are thrilled. There is undoubtedly a discrepancy between the high quality housing and lights and the inexpensive camcorder with its limitations, but fact is that you do get HD video and you get it all for a much lower price than anywhere else.
Summary
Bonica offers a modular underwater high-definition video camera system that can record 1280 x 720 pixel video at up to 30 frames per second for very good 720p playback on a HDTV. A soft inner housing can be used for snorkeling and guards against flooding if the camera is used in its hard acrylic deepwater (180 feet) housing. Optional single or dual video lights have 30, 40 and 60 watt settings and can be easily adjusted via ball joints. The setup is very easy to use and can yield amazingly good video as well as decent still shots from its 5-megapixel CMOS imager. The inexpensive camera records on standard SD cards and needs about 2GB for each hour of video.
Bonica Snapper HDDV
We like:
Amazing good and sharp 720p (1280 x 720 pixel) high definition video
Ingenious underwater case system with inner and outer case
Very simple operation
Bright, very readable 2.4-inch LCD display
You can shoot video and still pictures
Records onto inexpensive SD Cards
Camera small and handy; still handy even inside case
Powerful video lights with easily adjustable bracketing
High quality case, lights, filters and accessories
Not so much:
Auto focus often hunts for focus, resulting in blur and noise
Camera feels a bit plasticky
Some plastic threads in the light brackets easily strip
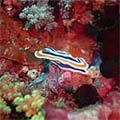
Bonica Snapper HDDV pictures -- The still images above were taken during a dive trip to CoCo View resort on the Honduran island of Roatan. Pictures by Carol Cotton and Conrad H. Blickenstorfer.
Specifications Bonica Snapper HDDV
Status
Added 1/2009
Camera Type
HD camcorder with underwater housing
Water Protection
Outer case rated to 180 feet; inner case rated to 12 feet
Size
6.5 x 5.5 x 5.5 (camera in housing); 4.4 x 2.7 x 1.25 (camera only)
Weight (oz.)
2.4 lbs. with batteries (camera + housing); 7.3 oz. camera only
Effective Pixels
5.0 megapixel CMOS
CMOS sensor
1/2.5"
Max pixel size
2560 x 1920
File formats
Stills: JPEG; video: MOV
Compression
Standard
Movie recording (best)
til full with sound @ up to 30fps
Movie pixels
1280 x 720 (H.264), 720 x 480, 352 x 240
Voice recording/sound annotation
TIl full/NA
Lens
Unknown
Focal length
7.5 - 21.5mm
Zoom (optical/digital)
3X optical
Aperture
f/3.6 to f/6.7
Focus modes
auto/macro
Focus minimum/macro
1.0 feet, 2 inches
Shutter speed
Unknown
Sensitivity (ISO)
Est. up to ISO 400
Autofocus system
Unknown
Metering
Unknown
White-balance modes
Auto, Sunny, Cloudy, Fluorescent, Tungsten
Shooting modes
Video or still
Capture modes
Auto, night shot, b&w, classic
Exposure compensation
+/-2EV in 1EV steps
Viewfinder Type
none
LCD size
2.4" color LCD
LCD type
outdoor viewable, 4 brightness adjustments
LCD construction
swivel-reversible color
Flash type
built-in
Flash range
unknown
Flash modes
3 (Auto, On, Off)
Video light type
built-in LED
Video light modes
3 (Auto, On, Off)
Camera internal memory
none
Storage Medium
SD Card (SDHC compatible)
I/O
USB
Battery type
Li-Ion rechargeable NP-60 (3.7V/1200mAh)
Battery life
Per manual: 30-70 minutes video or 110-200 pictures
List Price
Camera alone: US$240
Camera w/ soft and hard case: US$939
Camera w/ cases and 1 light: US$1,549
Camera kit with cases, dual lights, wide angle, filters: US$2,349


 What you get here is a very small and handy video camera that can shoot 720p high definition video at up to 30 frames per second as well as 8-megapixel stills. No need for tapes, disks or a hard drive; the Bonica records on standard SD Cards which are now inexpensively available in capacities of 4, 8, 16 and even 32 gigabyte, enough for hours of video.
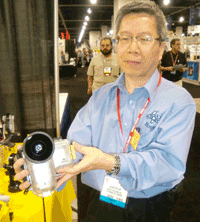 When we met with Bonica president Kenneth Ho at the 2008 DEMA show in Las Vegas, we were impressed with the camera and invited Bonica to send us a review unit for an upcoming dive trip. The box that arrived at the scubadiverinfo.com offices was larger than expected. That's because Bonica didn't just send the bare camera and underwater housing. Instead, we got a neat Bonica bag that contained the works: camera, housing, filters, two dive lights with brackets, remote control, and all the assorted power supplies, cables, manuals and a slew of other accessories.
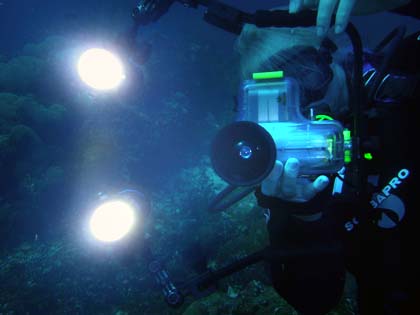 Bonica Snapper HDDV with dual lights on

 The bracket arms are made of aluminum and are marvelously light compared to some of the gear we've tested in the past. Ball joints allow them to be twisted and rotated at any angle and in any direction. The balls are hard plastic with grooves for rubber rings that provide the necessary friction. They don't grip quite as well as the rubber balls used in
 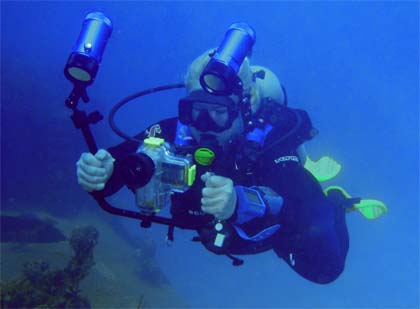 Approaching the wreck of the Prince Albert
 There is also a label below the buttons that explains the function of each. The Snapper HDDV case actually uses an interesting approach: the buttons operate a remote control that sits inside the case. The remote control even has its own water resistent inner case.